Wifi Troubleshooting
Smart Outlets
Understanding the LED Ring Colors

Initial WiFi Setup
NOTE: Your Smart Outlet should not have the water sensor plugged in during the WiFi setup process. If the sensor is activated accidentally, it can trigger an alert which could cause the LED ring to turn “RED”.
NOTE: If you have already input your Wi-Fi credentials into the app during a previous attempt. The Device may be connected. If the LED ring is “RED” ensure you have unplugged the float sensor. If the LED ring turns “Green” after 5 seconds, go to the app and see if your device is there. If the device is visible, you’re all set. If the device is not visible in the app and the LED ring is “Green” contact customer support. The device will need to be manually added to your account.
If the LED ring is “RED”.
Press the reset button for more than 3 seconds but less than 7 seconds.
The LED ring should turn Solid Amber.
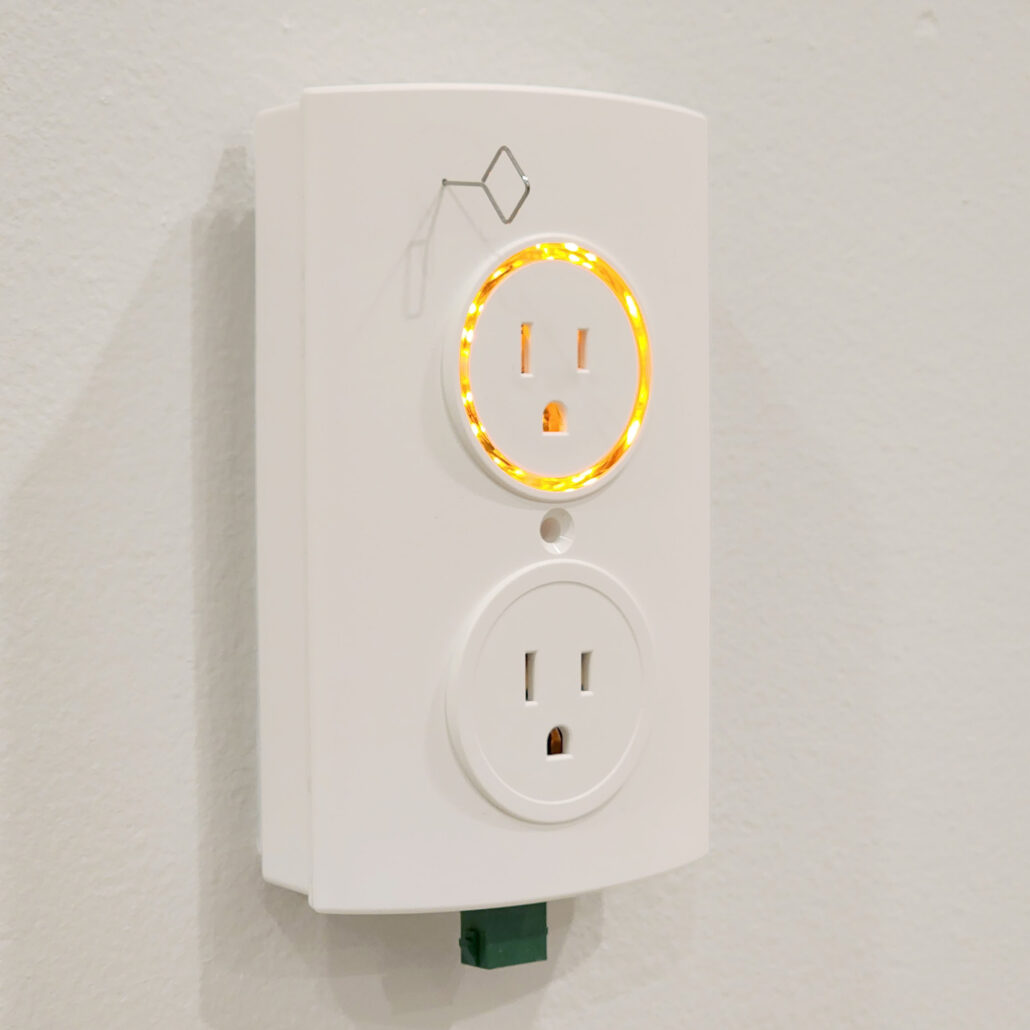
Image 1: Place the reset pin or a paper clip into the reset hole and press lightly.
Once the LED ring is “Solid Amber”.
Open the App on your smart device and select the circular button with a plus (+) icon in the lower right corner to start the WiFi setup (provisioning) process.
Curious about what “Provisioning” means?
Provisioning is the process of connecting your smart device to your home network by passing the selected network and its credentials to the Smart Outlet.
Once the provisioning process has started (Image 2). In the app, select the amber color (Image 2) to start the app connection process. This will start the communication between your mobile device and the Smart Outlet. During this process, the Smart Outlet will broadcast the network name “PumpSpy”. You will be asked to allow a connection to this network temporarily. Select the “PumpSpy” network by tapping on it.

Image 2: Provisioning process start screen.
Once the connection from the mobile device to the smart outlet is successful, a list of available networks in your home (image 3) will be displayed. Select the network you want to connect to. If you are connecting to a new router with Wi-Fi 6e protocol try selecting the “IOT” network or “Guest network” to connect to. Input your password for this network. If you are unsure of the network credentials, consult the instructions that came with your new router.

Image 3: Network list.
With the network credentials successfully passed from the mobile device to the Smart Outlet. The device will display a screen to save the device name to your account (Image 4).
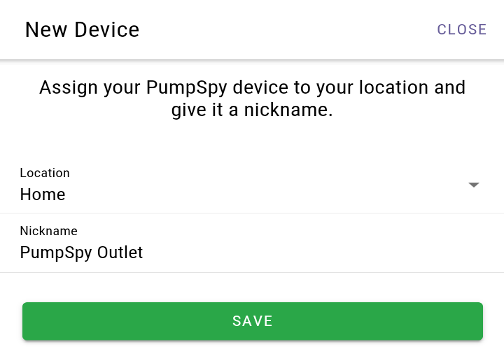
Image 4: Rename device and save.
Once you click on “save”, the app will direct you to the app home screen. If you select the “Home” location, your device name will be displayed on the next screen. Select your device to see the status of your Smart Outlet device.
Congratulations! You are now set up and will have peace of mind with smart pump monitoring technology.
Cannot Connect to "PumpSpy" Network
If you are unable to connect to the temporary network named “PumpSpy”, follow these steps.
- Find the provided WiFi Setup Tool or a small paperclip.
- Insert the WiFi Setup Tool or the paper clip into the WiFi Setup Button (Image 1).
Image 1 - The LED ring may already be amber. Press and hold the WiFi Setup Button for more than 3 seconds but no longer than 7 seconds. This will reset the Smart Outlet and put it into WiFi setup mode.
- Retry the connection process within the app.
Connection Drops and Does Not Reconnect Automatically
If your device lost connection and did not reconnect automatically, follow the Initial WiFi Setup instructions.
If you are unsuccessful after multiple attempts, something may have changed with your WiFi network configuration. Please contact technical customer support for assistance.
Manual Connection Process
There are some instances when the new device will not connect using the app on your mobile device. This is where the manual connection process comes in.
Having trouble understanding how to log into your home router?
We will continue to add Router links to this list in an attempt to help you get connected.
- Orbi Router: Web Site last accessed on 2/20/2023
- Eero Pro 6E Router: Web Site last accessed on 2/20/2023
- Xfinity Technicolor Router Admin tools: Website last accessed 2/20/2023
Data Is Not Current in App
Note: Your app should contain cycle data that is current, accurate, and up to date.
Note: If your app shows outdated data, look at your “connections” tab. Your “last signal update” should be within the last 2-3 minutes.
If the last signal update is older than 3 minutes:
- Please pull down from the top of the screen to refresh.
- If your “last signal update” does not update, please navigate to “settings” in the bottom right corner, then select “sign out”.
- Once you sign back in, you should see your app data refreshed, and your last signal update should be current.
Clearing Notifications Badges
Note: Once an alert has been sent, the app will display a notification badge on the device’s home screen.
Please open the app, select the corresponding device, and then go to the “alerts” tab to view alerts, which will then clear notifications badges.
Unknown Error
Note: “Unknown error” will only happen during logging into the app, it is not the same as “bad credentials”.
In order to work around the error, please go to the device WiFi settings and toggle WiFi so that:
- If you were on WiFi, turn it off.
- If you were on mobile data, turn WiFi on.
The changing of your WiFi status on your mobile device will allow you to move forward. Once you have successfully logged in, you can return your WiFi to your preferred setting.